


Preparing Your Logo or Branding for Professional Printing: A Complete Guide
Whether you're printing business cards, brochures, or large banners, ensuring your logo and branding materials are ready for professional printing is essential. A poorly prepared file can result in blurry prints, incorrect colors, or even rejection from the printing company. To avoid these pitfalls, follow this step-by-step guide to preparing your logo and branding assets for professional printing.
Choose the Right File Format
Not all file formats are created equal when it comes to professional printing. Printers require high-quality, vector-based files for the best results. Here are the most commonly used file formats and when to use them:
Vector Files (Best for Logos & Branding)
- AI (Adobe Illustrator): Preferred format for professional design and printing.
- EPS (Encapsulated PostScript): A universal vector format supported by most printing software.
- PDF (Portable Document Format): High-quality format that maintains vector integrity and embeds fonts.
Raster Files (For High-Quality Images Only)
- TIFF: Preferred for high-quality images with lossless compression.
- JPG: Acceptable for printing, but must be high-resolution.
Note: CELINA specifies that raster artwork must be at a minimum of 200 DPI at 100% scale, with 300 DPI recommended. Files larger than 1GB are not accepted. Unsupported formats include Adobe Photoshop (.psd/.psb), InDesign, Corel Draw, and Microsoft files (Word, Excel, PowerPoint).
Ensure High Resolution and Proper Image Quality
Resolution plays a crucial role in print clarity. Professional printing requires high-resolution images to avoid pixelation.
How to Check and Adjust Resolution:
- Open your image in Photoshop or another image editor.
- Go to Image > Image Size and check the DPI.
- If it’s below 200–300 DPI, resampling may help but can’t replace original quality.
- Always use high-resolution source images instead of enlarging smaller ones.
Use the Correct Color Mode
Printing uses CMYK (Cyan, Magenta, Yellow, Black) color mode, while digital screens use RGB. Converting files to CMYK before printing ensures accurate color reproduction.
How to Convert to CMYK:
- In Illustrator: File > Document Color Mode > CMYK.
- In Photoshop: Image > Mode > CMYK Color.
- In InDesign: Set to CMYK when creating a new document.
Note: CELINA advises submitting files in CMYK and including PMS/Pantone Plus numbers. If specific colors aren’t requested, the closest match will be chosen. Pantone matching is recommended, though exact matches can’t be guaranteed. Always provide a physical color sample if accuracy is critical.
Embed Fonts or Outline Text
To prevent font substitutions or layout shifts, always embed fonts or convert them to outlines.
- In Illustrator: Select text → Type → Create Outlines.
- In PDFs: When exporting, select “Embed Fonts.”
Note: CELINA recommends converting all text to outlines (paths) or providing font files via email.
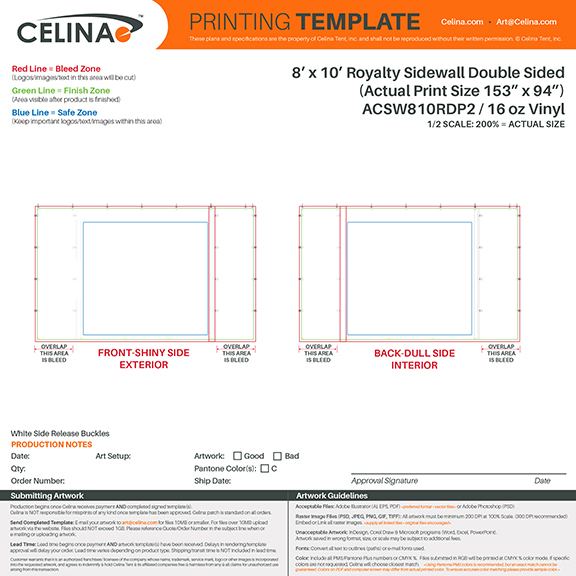
Bleed, Trim, and Safe Zone Preparation
Bleed (Prevents White Edges)
- Include at least 0.125 inches (3mm) bleed around your design.
- Extend background elements into this area to avoid white edges.
Trim Line (Final Cut Size)
- This marks where your design will be cut to size.
- Keep essential design elements within this boundary.
Safe Zone (Keeps Text & Elements Safe)
- Place all text and graphics at least 0.125 inches (3mm) inside the trim line.
- Anything outside this area risks being trimmed off.
Check for Transparency Issues
Transparency effects can cause print errors if not flattened before submission.
- In Illustrator: Object > Flatten Transparency.
- In Photoshop: Merge layers containing transparency effects.
Naming and Organizing Your Files
Use clear, descriptive filenames and keep assets organized before submission.
- Example Names: Company_Logo_CMYK.ai | Brochure_Front_300DPI.pdf | BusinessCard_3.5x2_Bleed.psd
- Group fonts, images, and source files in one folder and compress to .zip.
Note: CELINA requests referencing your Quote/Order Number in the subject line when emailing or uploading. For files up to 1GB, CELINA provides a secure upload link.
Proof and Pre-Flight Check Before Sending
- ✅ Ensure all images meet resolution requirements.
- ✅ Verify CMYK color mode.
- ✅ Confirm bleed, trim, and safe zones are accurate.
- ✅ Embed or outline all fonts.
- ✅ Save in the correct format.
- ✅ Print a small test proof for review.
Communicate with Your Printer
Every printer has different specifications—always confirm their exact needs before sending files.
Key Questions to Ask:
- What file formats do you prefer?
- What are your bleed and margin requirements?
- Do you prefer CMYK or Pantone colors?
- Do you require a digital or physical proof?
Final Thoughts
Properly preparing your logo and branding files ensures high-quality results and a smooth printing process. By selecting the right formats, maintaining resolution, embedding fonts, and following bleed and trim standards, you’ll achieve consistent, professional prints.
Take the time to proof your files and communicate with your printer—your brand’s image deserves precision and care.